

How To Generate Ssh Key In Windows For Git
Git and GitHub are essential tools for every developer. They're widely used in nearly every kind of software development project.
There are other Git hosting services like Gitlab and Bitbucket, but GitHub is the about popular choice for developers. You tin even edit your profile to seem more than attractive to recruiters.
You tin employ Git and GitHub to organize your projects, collaborate with other developers, and — of course — at Kinsta.
But because Git and GitHub are related yet dissimilar tools, yous need to update your workflow with each of them constantly.
We recommend using SSH keys for each one of your machines. So, in this tutorial, you'll acquire what they are, some of their advantages, and how to generate and configure GitHub SSH keys.
Allow's become started!
What Are SSH Keys?
Only put, SSH keys are credentials used for the SSH (Secure Trounce) protocol to enable secure admission to remote computers over the internet. Commonly, that authentication occurs in a command-line environment.
This protocol is based on client-server architecture, which means y'all as the user (or "client") need to utilize special software, called an SSH client, to log into a remote server and execute commands. This is basically what you're doing when authenticating via a terminal to GitHub.
But SSH is not only used for GitHub. It'due south broadly used by other platforms like Kinsta, Google Cloud, and Amazon Web services to create a secure channel to admission their services.
Now, heading into how SSH keys really work, you need to understand the differences betwixt public and private keys.
Public vs Private Keys
Allow'due south start with the basics.
The SSH protocol uses a technique of cryptography called asymmetric encryption. This term may sound complicated and weird, merely null could be farther from the truth.
Basically, asymmetric encryption is a organization that uses a pair of keys, namely public and private keys.
As you may gauge, the public central can be shared with anyone. Its chief purpose is to encrypt data, converting the message into surreptitious code or ciphertext. This central is normally sent to other systems — for case, servers — to encrypt the data before sending information technology over the internet.
On the other hand, the private key is the one that yous must keep to yourself. It's used to decrypt the encrypted data with your public key. Without information technology, it's incommunicable to decode your encrypted information.
This method allows y'all and the server to keep a safety advice channel for transmitting the information.
Here's what happens in the background when you connect to a server via SSH:
- The client sends the public key to the server.
- The server asks the client to sign a random bulletin encrypted with the public primal using the individual fundamental.
- The client signs the bulletin and frontwards the outcome to the server.
- A secure connection is established betwixt the client and the server.
It's of import to keep your private keys safe and share them with anyone under no circumstances. They're literally the central to all the information sent to you.
Using SSH Keys With GitHub
Since August 13, 2021, Github no longer accepts password authentication for command-line access. This means at present you need to authenticate via a personal access token or employ an SSH key (a lilliputian chip more convenient).
Hither'south what happens when you try to authenticate with your GitHub password over HTTP in a last:
Username for 'https://github.com': yourusername Password for 'https://[email protected]': remote: Back up for password authentication was removed on Baronial xiii, 2021. Delight use a personal access token instead. remote: Please see https://github.blog/2020-12-15-token-authentication-requirements-for-git-operations/ for more information. fatal: Authentication failed for 'https://github.com/yourusername/repository.git/' GitHub needs your public central to authorize you to edit any of your repos via SSH.
Allow's see how y'all can generate SSH keys locally.
How to Generate SSH Keys Locally
Now that you understand a trivial flake almost the SSH protocol and the differences betwixt public and private keys, information technology'southward time to ready the secure SSH channel between your machine and your GitHub repos.
Earlier we move forward, you should already have a GitHub account, and a terminal/command prompt with Git installed in your arrangement. If you're running Windows, make certain you installed Git bash, which has all the tools you lot'll need to follow forth with this tutorial built-in.
The OpenSSH customer is the well-nigh popular open-source software used to connect via SSH. You won't need to worry nigh your operating organization considering it's installed past default on Linux, macOS, and Windows 10.
You demand to fire upwardly a command prompt on Windows or a terminal on Unix-based systems to generate local SSH keys. Usually, yous can practise this past searching for "terminal", "cmd", or "powershell" in your application panel, and then clicking the icon that shows up.

Later doing this, you should have a window similar to the following epitome.

Run the post-obit command to generate a local SSH pair of keys:
ssh-keygen -t ed25519 -C "[electronic mail protected]" It's fourth dimension to tell you a secret: No one tin really remember this control! Most developers have to Google information technology every time because:
- It's a really long command, with forgettable, random-seeming numbers.
- We utilise information technology rarely, so it's not worth it to commit it to retention about of the fourth dimension.
Notwithstanding, it's of import to understand each control that nosotros introduce into our terminals, and then let's run across what each role of this one means.
Subscribe Now
- ssh-keygen: The command-line tool used for creating a new pair of SSH keys. You can see its flags with
ssh-keygen aid - -t ed25519: The
-tflag is used to betoken the algorithm used to create the digital signature of the key pair. If your arrangement supports it,ed25519is the best algorithm you tin can apply to create SSH central pairs. - -C "e-mail": The
-cflag is used to provide a custom comment at the end of the public key, which normally is the email or identification of the creator of the key pair.
After you lot've typed the command into your final, you lot'll take to enter the file to which you would like to save the keys. By default, it'due south located in your home directory, in a subconscious folder named ".ssh", simply you lot can change information technology to whatever you like.
And so you'll exist asked for a passphrase to add to your key pair. This adds an actress layer of security if, at any time, your device is compromised. It is non obligatory to add a passphrase, but it'due south ever recommended.
This is what the whole process looks like:
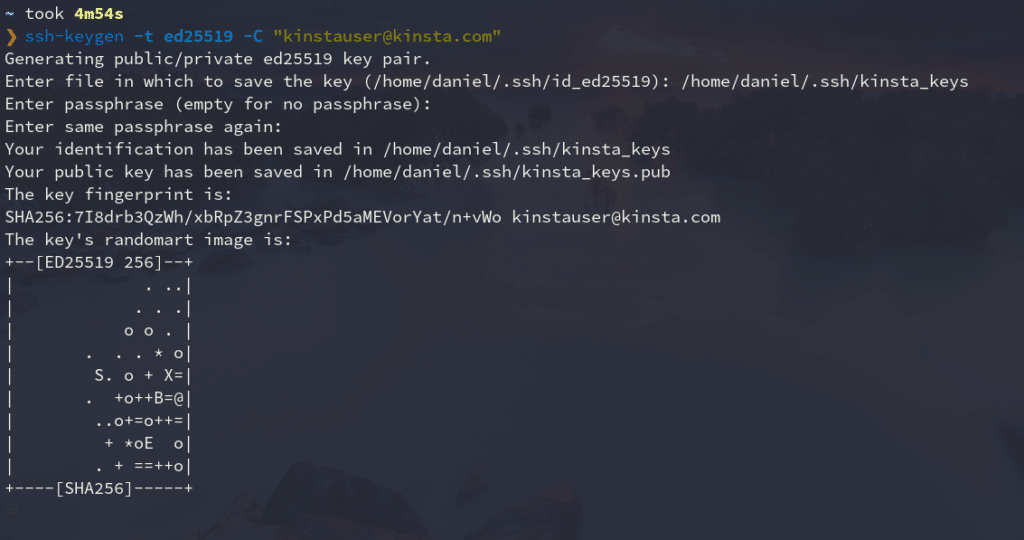
Equally y'all can see, this command generates ii files in the directory you selected (unremarkably ~/.ssh): the public key with the .pub extension, and the individual one without an extension.
We'll show you how to add the public key to your GitHub account after.
Add together SSH Key to ssh-agent
The ssh-amanuensis program runs in the background, holds your private keys and passphrases safely, and keeps them ready to use by ssh. It's a keen utility that saves you from typing your passphrase every time you want to connect to a server.
Because of this, you're going to add your new private key to this agent. Here's how:
- Make certain ssh-amanuensis is running in the background.
eval `ssh-amanuensis` # Agent pid 334065If you get a message like to this if everything is fine. Information technology means the ssh-agent is running under a particular process id (PID).
- Add your SSH private key (the one without extension) to the ssh-agent.
ssh-add together ~/.ssh/kinsta_keysReplace kinsta_keys with the name of your SSH key. If this is the kickoff cardinal you've created, it should exist named "id_algorithm_used," for example, id_ed25519.
Add SSH Key to GitHub Account
The final step is to add your public central to your GitHub account. Just follow these instructions:
- Copy your SSH public cardinal to your clipboard. Yous can open up the file where information technology is located with a text editor and copy it, or employ the terminal to evidence its contents.
cat ~/.ssh/kinsta_keys.pub # ssh-ed25519 AAAAC3NzaC1lZDI1NTE5AAAAIJl3dIeudNqd0DPMRD6OIh65tjkxFNOtwGcWB2gCgPhk [email protected] - Log into GitHub ] and get to the upper-right section of the page, click in your contour photo, and select Settings.

GitHub settings. - Then, in profile your settings, click SSH and GPG keys.
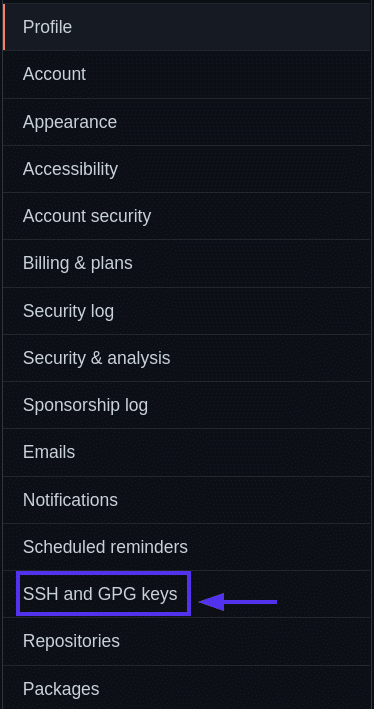
SSH and GPG keys. - Click the New SSH key button.
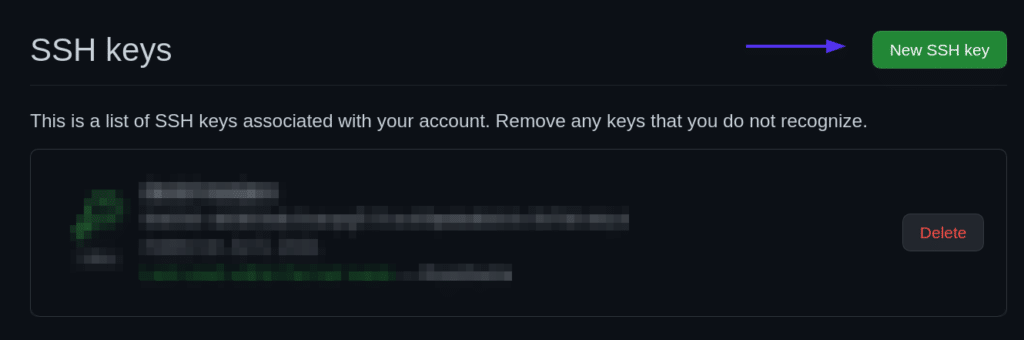
New SSH key button. - Give your new SSH fundamental on GitHub a Title — usually, the device you'll use that fundamental from. And so paste the central into the Primal area.
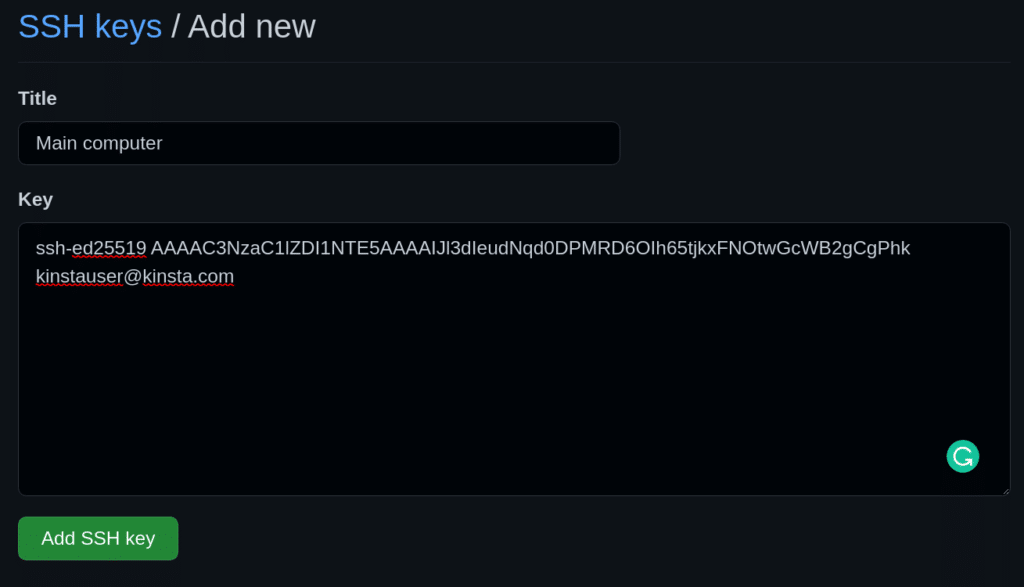
Add a new SSH key form. - Add your SSH fundamental.

Add SSH key button.
Test SSH Connection With a Repo Button
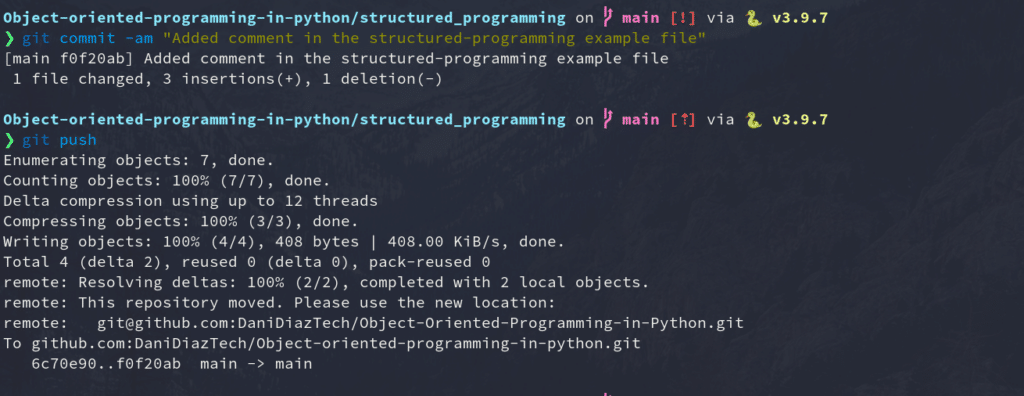
It's time to test everything you've washed so far. Y'all're going to change, commit, and button to i of your existing repos using SSH to ensure your connexion is ready correctly.
For our example, we will modify the simple HTML site nosotros created in our Git for Web Development tutorial.
Commencement, we'll need to clone the repository into our local motorcar. We can go to the repo folio on GitHub and re-create the SSH address it provides.
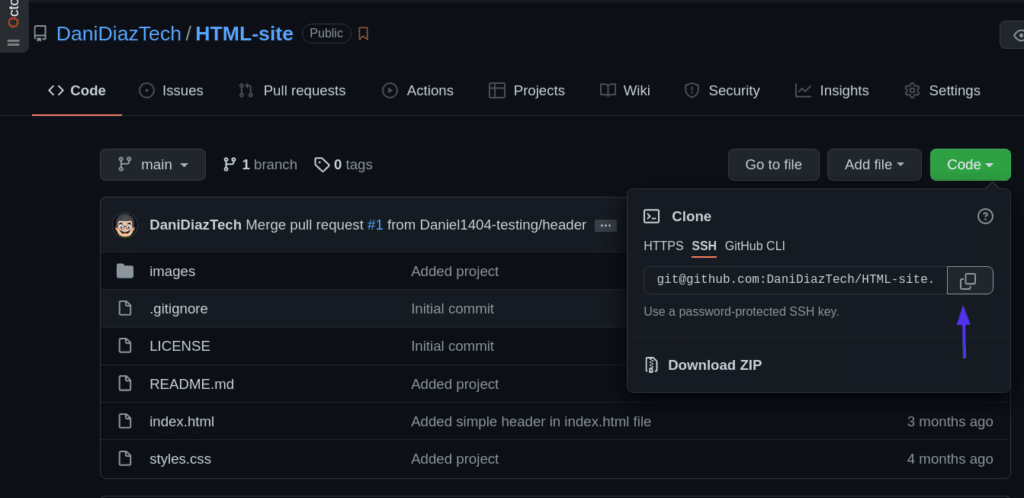
So, clone the repo using a terminal:
git clone [electronic mail protected]:DaniDiazTech/HTML-site.git Now, let'southward add a simple <h1> tag in the index.html file:
... <div class="container my-ii"> <h1 class="text-center">A new title!<h1> </div> <div grade="container my-3"> ... 
We're non touching any JavaScript or CSS to keep this edit unproblematic. Only if you're skilled with JavaScript, y'all might observe a place at Kinsta. Check the coding skills you need to be part of the Kinsta team.
After doing this, commit the changes:
git commit -am "Added a uncomplicated title" And push them into GitHub but every bit you'd normally do.
git push If everything went fine, congratulations! Yous simply gear up up an SSH connection between your machine and GitHub.
Manage Multiple SSH Keys for Dissimilar GitHub Accounts
If y'all have multiple GitHub accounts — allow'south say ane for your personal projects and one for your piece of work — it's difficult to use SSH for both of them. You lot would unremarkably need separate machines to authenticate to different GitHub accounts.
Simply this can exist solved easily by configuring the SSH config file.
Allow's get into information technology.
- Create another SSH key pair, and add it to your other GitHub account. Keep in mind the proper noun of the file you're assigning the new fundamental to.
ssh-keygen -t ed25519 -C "[email protected]" - Create the SSH config file. The config file tells the ssh program how information technology should carry. By default, the config file may not exist, then create information technology inside the .ssh/ folder:
bear upon ~/.ssh/config - Modify the SSH config file. Open the config file and paste the code beneath:
#Your solar day-to-solar day GitHub account Host github.com HostName github.com IdentityFile ~/.ssh/id_ed25519 IdentitiesOnly yes # Work account Host github-work HostName github.com IdentityFile ~/.ssh/work_key_file IdentitiesOnly yeah
Now, every time you need to authenticate via SSH using your work or secondary business relationship, you lot tweak a fleck the repo SSH accost, from:
[email protected]:workaccount/projection.git …to:
[email protected]:workaccount/projection.git
Summary
Congratulations — y'all've learned about of the applied knowledge y'all demand to connect to GitHub via SSH!
This tutorial discussed the demand for the SSH protocol, the differences between public and private keys, how to generate keys, add together them to GitHub, and fifty-fifty manage multiple SSH keys for different GitHub accounts. Keep in mind that unless you want to lose admission to everything, your private key needs to stay that way: private.
With this knowledge, now yous're ready to develop a flawless workflow with Git and GitHub. Proceed coding!
Save time, costs and maximize site performance with:
- Instant help from WordPress hosting experts, 24/seven.
- Cloudflare Enterprise integration.
- Global audience accomplish with 34 data centers worldwide.
- Optimization with our built-in Awarding Performance Monitoring.
All of that and much more, in one plan with no long-term contracts, assisted migrations, and a 30-day-money-back-guarantee. Check out our plans or talk to sales to find the plan that'due south right for you.
Source: https://kinsta.com/blog/generate-ssh-key/
Posted by: titusshence1962.blogspot.com
0 Response to "How To Generate Ssh Key In Windows For Git"
Post a Comment