

How To Quickly Resize Photos In Windows 10

Most prototype viewing programs have a built-in feature to assist you change the size of images. Here are our favorite paradigm resizing tools for Windows. Nosotros've picked out a built-in option, a couple of 3rd party apps, and even a browser-based tool.
Mayhap you need to upload a smaller version of a photograph to Facebook (they exercise it automatically and badly when you upload anyway) or some other social site. Maybe you want to include an image that isn't and so ridiculously oversized in an e-mail. Or maybe yous want only the right size image to include in a blog post or Word document. Whatever your reason, it's not hard at all to resize an image. We've rounded up our favorite tools for doing information technology in Windows, whether you demand to resize just 1 image or a whole batch at once.
A Quick Notation on Resizing Images
The quality of a resized prototype really depends on the original image you're resizing. Photographs tend to do best, at to the lowest degree when you're reducing the size of an image, because they have lots of item to begin with. High resolution photos are more than open to blowing upwards to larger sizes, merely even they have their limits—accident up a photograph besides much and things offset to go grainy.
Here'due south an case of a resized photograph. The original prototype was 2200×1938 pixels, and we cropped it down to a mere 400×352. The image is crisp, and the details even so nowadays.
If you're working with a screenshot that you took on your PC or mobile device—or any prototype that contains text—resizing tends not to piece of work terribly well. Hither'due south an example of a screenshot taken at 1920×1040 pixels, and and so resized down to 600×317 to fit on our site.
Information technology's okay if you just want to show the broad await of things, merely non so much for detail. That's why we prefer cropping screenshots to resizing them for our articles, like with the image below.
And so, with that out of the way, let'due south move onto the Windows tools you can apply to resize your images.
Congenital-In: Use Paint To Resize Your Photos
Paint has been a staple of Windows since version one.0 in 1985. Chances are you've used it before. Pigment opens most common file types (BMP, PNG, JPG, TIFF, and GIF) and offers a very straightforward approach to resizing images.
In Paint, open up your image by opening up the File carte, and then clicking the "Open" command.

Find and select the image you want to resize, and then click the "Open up" button.

On the Home tab of the Pigment toolbar, click the "Resize" button.

Pigment gives you lot the selection of resizing past pct or by pixels. It uses percent by default, and that's fine for rough resizing. If you need something specific, you'll need to switch over to using pixels. When you type a horizontal or vertical value, Paint automatically creates the other value for you lot to maintain the original image's dimensions.
Select the percentage you desire, or the desired dimensions, and so click the "OK" button.

If you only demand to resize one prototype at a time and don't want to install any third-party apps, Pigment is a pretty decent resizing solution.
Annotation: As of 2017, Paint has been added to the deprecated list of apps no longer being developed by Microsoft. Instead, they are replacing Paint with Paint 3D. Paint is likely non going away for a while, though, and you'll nonetheless be able to download it from the Windows Shop.
Tertiary Party App: Use PicPick To Resize Photos and a Whole Lot More
PicPick has a similar-looking interface to Paint, though it packs a lot more features under the hood, including meliorate editing and note tools, and solid screen capture utility. It's free for personal use, and the commercial utilise license is about $25 .
On the PicPick splash screen, click the "Open an existing epitome" link, and then find the image yous desire to resize. You can also elevate an image from File Explorer onto an open PicPick window.
On the toolbar, click the "Resize" button, and then click "Image Resize" on the dropdown menu.

PicPick lets yous resize by percentage or by pixels. Information technology uses percentage by default, which is expert for rough resizing. If y'all need to resize to specific dimensions, switch over to using pixels. When you type a width or tiptop value, PicPick automatically sets the other value for yous to maintain the original epitome'southward dimensions. Y'all can disable this past deselecting the "Go on aspect ratio" check box, though nosotros're not sure why you'd desire to.
Select the percentage y'all desire, or the desired dimensions, and then click the "OK" button.

While PicPick (and Paint, for that matter) does a fine task of resizing one epitome at a time, sometimes yous've got a bunch of paradigm y'all need to resize to the aforementioned dimensions. For that, we turn to our next couple of tools.
Tertiary Party App: Use IrfanView to Batch Resize Lots of Images at Once
IrfanView is beginning and foremost an prototype viewer, and it's a great one. It's fast, lightweight, and can open only virtually every image format in being (even a lot of audio and video formats). And best of all, it's free.
It doesn't include a lot of the editing and notation tools of an epitome editor similar PicPick, but it is great for rapidly resizing, cropping, and rotating images. And there are lots of plugins available that extend its functionality.
Resize a Single Image in IrfanView
To resize a unmarried image in IrfanView, open the Image menu, and then click the "Resize/Resample" command.

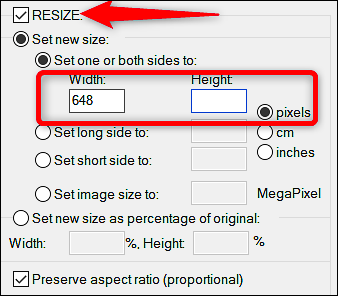
Yous can resize by specific dimensions (pixels, centimeters, or inches) or by percent. IrfanView uses dimensions past default, which is great for when you need images to exist a specific size, though you can switch to percentages for rough resizing.When y'all blazon a width or height value, IrfanView automatically sets the other value for yous to maintain the original image'south dimensions. You can disable this by deselecting the "Preserve aspect ratio (proportional)" check box.
Type in the new dimensions (or percentage) for the prototype, then click the "OK" button.

That'due south it. Your new paradigm has been resized and is ready to apply!
Resize a Batch of Images at In one case in IrfanView
IrfanView has a built-in batch tool if you accept multiple images that y'all demand to convert all at one time. The batch tool can be a little flake confusing to piece of work with, since you can employ information technology to employ simply about any of the functions IrfanView includes. But in one case you get a hang of it and what options to use, it's a great addition to an already excellent product.
Open the File menu, and then click the "Batch Conversion/Rename" control.

Adjacent, in the right pane, navigate to the images you want to resize, select them, and then click the "Add together" button. When you've got your images added, click the "Advanced" button over to the left.

The next window has a lot of features and is a little bit of an eye sore. The options we'll need for resizing images are all over on the left, so we'll but focus our attention there.

Select the "Resize" check box, and then enter the new size yous want for all your images. The options here are the aforementioned as y'all'd find when resizing a unmarried image. When you've got it set up then click the "OK" button to shut the Advanced window.
Back in the main Batch Conversion window, make note of the output directory. That'southward where your new, resized images are stored. If y'all want, you can select a dissimilar binder or merely click the "Use Current ('Look In') Directory" button to accept the new images save to the same folder as the originals. And don't worry, your originals are retained past default.
Finally, click "Start Batch" to convert all your images.

On the Web: Use BulkResizePhotos for Quick Batch Resizing
If downloading and installing yet another program onto your computer isn't something you lot want (or if you're not using your own PC), at that place are lots of online resizing tools that y'all tin access with simply your web browser. Ane of our favorites is BulkResizePhotos, a free service that lets you lot resize, edit, crop, and shrink images. It'southward also very fast, considering it doesn't upload the images to their servers. Your images never get out your computer.
On the site, click the "Choose Images" button, and and then find and select the images you want to resize. Y'all tin choose a unmarried images or hundreds at one time. Click the "Open" push button when you're ready.

On the next screen, y'all can choose how to resize the image—Scale, Longest Side, Width, Elevation, or Exact Size. Select an choice, type in the size you want, so click the "Outset Resizing" button.

Equally the images are resized, they are saved to your Downloads folder (or whatever folder you've got set upward to save downloads from your browser).
Have a favorite tool we didn't mention? Permit united states know most it in the comments!
Source: https://www.howtogeek.com/354015/how-to-resize-images-and-photos-in-windows/
Posted by: titusshence1962.blogspot.com
0 Response to "How To Quickly Resize Photos In Windows 10"
Post a Comment